


Now let's start with launching our K8s cluster with Deployment.✨
What is Deployment in K8s?
A Kubernetes Deployment tells Kubernetes how to create or modify instances of the pods that hold a containerized application.
Deployments can help to efficiently scale the number of replica pods, enable the rollout of updated code in a controlled manner, or roll back to an earlier deployment version if necessary.
Deployments are designed for stateless application. A stateless application is an application program that does not save client data generated in one session for use in the next session with that client. Each session is carried out as if it was the first time and responses are not dependent upon data from a previous session.
Benefits of using Deployment in K8s
There are several benefits, some are: -
Saves time and Reduce errors: Kubernetes saves time and mitigates errors by automating the work and repetitive manual functions.Scale up/down: Kubernetes makes it easy to scale applications up or down by adding or removing containers as needed. This allows applications to automatically adjust to changes in demand and ensures that they can handle large volumes of traffic.Rollback: Kubernetes provides redeploying a previously deployed revision of an application as a new deployment.Auto-healing: Kubernetes deployment controller continuously monitors the health of pods and nodes, it can make changes in real-time, like replacing a failed pod or bypassing down nodes to ensure the continuity of critical applications.High Availability: Deployments automate the launching of pod instances and ensure they are running as defined across all the nodes in the Kubernetes cluster. More automation translates to faster deployments with fewer errors.Portable: Kubernetes abstracts away underlying infrastructure, making it easy to deploy applications consistently across different cloud providers or on-premises environments.Easy deployment and updates: Kubernetes allows developers to specify the desired state of their applications & it will automatically ensure that the actual state matches the desired state.Resource Utilization: Kubernetes automatically schedules containers based on the available resources, which helps to improve resource utilization and reduce waste. This can help reduce costs and improve the efficiency of your applications.Declarative Configuration: Deployment configurations in K8s are declared in YAML files, making it easy to define, version, and reproduce application deployments consistently.Service Discovery and Load Balancing: K8s provides built-in mechanisms for service discovery, allowing applications to find and communicate with each other. Load balancing ensures even distribution of traffic among instances.
Deployment Strategies in K8s
Kubernetes offers several deployment strategies to handle a broad range of application development and deployment needs. Once you define the desired state of the application, the deployment controller goes to work. It can make changes at a controlled rate to optimize the deployment.
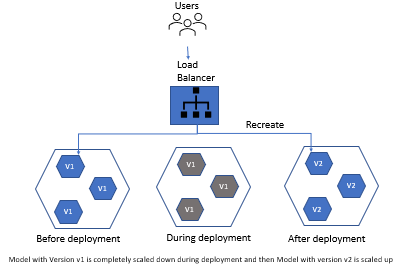
Recreate Deployment: The recreate deployment terminates pods that are currently running and ‘recreates’ them with the new version. This approach is commonly used in a development environment where user activity isn’t an issue.Because the recreate deployment entirely refreshes the pods and the state of the application, you can expect downtime due to the shutdown of the old deployment and the initiation of new deployment instances.
Rolling Update Deployment: The rolling update deployment provides an orderly, ramped migration from one version of an application to a newer version. A new ReplicaSet with the new version is launched, and replicas of the old version are terminated systematically as replicas of the new version launch. Eventually, all pods from the old version are replaced by the new version.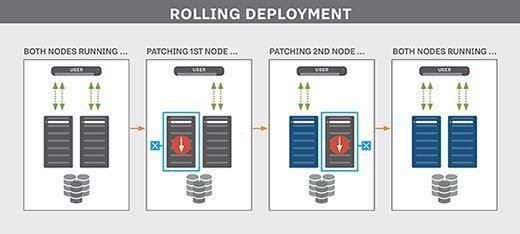
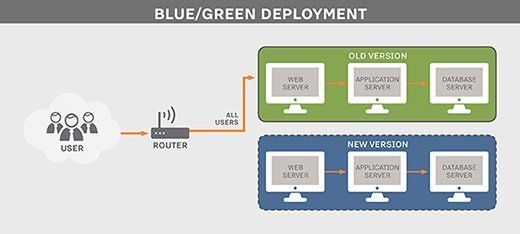
Blue/Green Deployment: The Blue/Green strategy offers a rapid transition from the old to new version once the new version is tested in production. Here the new ‘green’ version is deployed along with the existing ‘blue’ version. Once there is enough confidence that the ‘green’ version is working as designed, the version label is replaced in the selector field of the Kubernetes Service object that performs load balancing. This action immediately switches traffic to the new version.The Kubernetes blue/green deployment option provides a rapid rollout that avoids versioning issues. However, this strategy doubles the resource utilization since both versions run until cutover.
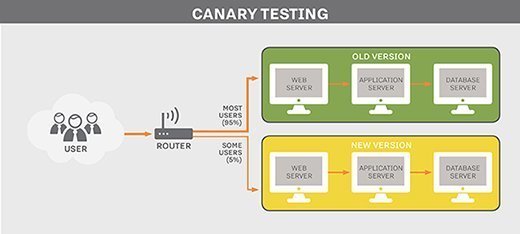
Canary Deployment: In a canary deployment, a small group of users is routed to the new version of an application, which runs on a smaller subset of pods. The purpose of this approach is to test functionality in a production environment. Once satisfied that testing is error-free, replicas of the new version are scaled up, and the old version is replaced in an orderly manner.Canary deployments are beneficial when you want to test new functionality on a smaller group of users. You can easily rollback canary deployments, this strategy helps gauge how new code will impact the overall system operation without significant risk.
Create a Deployment File
The deployment file is written in YAML. The desired state is described in deployment.yml file containing the characteristics of the pods, coupled with how to operationally run these pods and their lifecycle events. After we submit this file to the K8s control plane, it creates a deployment controller, which is responsible for converting the desired state into reality and keeping that desired state over time.
#deployment.yml

apiVersion: apps/v1
kind: Deployment
metadata:
  name: nginx-deployment
  labels:
    app: nginx
spec:
  replicas: 3
  selector:
    matchLabels:
      app: nginx
  template:
    metadata:
      labels:
        app: nginx
    spec:
      containers:
      - name: nginx
        image: nginx:1.14.2
        ports:
        - containerPort: 80
In the above example, there are some key components used in the deployment.yml file. Let's have a look about them.
apiVersion: describes which K8s API version is to be used to create the object.kind: defines the object we want, like a pod or deployment etc.metadata: helps to identify the object using name, unique ID and an optional namespace.labels: are key-value pairs with which we tag our objects during or after their creation.spec: defines the desired state of the Deployment, including the number of replicas, the pod template, and any other related specifications.replicas: specifies the desired number of identical pod replicas to run.selectors: are used to specify criteria based on labels to identify and group related objects.matchLabels: specifies the labels that the Replica Set created by the Deployment should use to select the pods it manages.template: contains the pod template used for creating new pods, including container specifications, image names, and container ports.name: assigns a name to the container.image: specifies the Docker image to use for this container.ports: defines the ports to open in the container.containerPort: indicates that the container will listen on that port.
Deploy a sample todo-app on K8s
In this we will be using the “Auto-healing” and “Auto-Scaling” feature.
Step 1: Login to AWS Console.
Step 2: Create 2 instances. One master and other node.

Step 3: After creating, connect both instances with the terminal.
Step 4: Now, On master clone the repository: django-todo-cicd.
git clone https://github.com/Smriti0821/django-todo-cicd.git

Step 5: Create an image from Dockerfile.
#Dockerfile

FROM python:3
WORKDIR /data
RUN pip install django==3.2
COPY . .
RUN python manage.py migrate
EXPOSE 8000
CMD ["python","manage.py","runserver","0.0.0.0:8000"]
docker build . -t smritisharma21/django-todo


Step 6: Check for the docker image.
docker images

Step 7: Push image into DockerHub.
docker login

docker push smritisharma21/django-todo:latest


Step 8: Then create a Manifest file named deployment.yml.
deployment.yml

apiVersion: apps/v1
kind: Deployment
metadata:
  name: todo-deployment
  labels:
    app: todo-app
spec:
  replicas: 3
  selector:
    matchLabels:
      app: todo-app
  template:
    metadata:
      labels:
        app: todo-app
    spec:
      containers:
      - name: todo-app
        image: smritisharma21/django-todo:latest
        ports:
        - containerPort: 8000

Step 9: Apply the deployment to your k8s (minikube) cluster by following the command:
sudo su
kubectl apply -f deployment.yml

Step 10: We can verify the pods are running,
kubectl get pods
Step 11: On the worker node, to test docker container working or not.
# Get the list of running docker container
docker ps

# Switch to root user
sudo su

# Get into the docker container
sudo docker exec -it <docker-container> bash

curl -L http://127.0.0.1:8000
Step 12: Now we can delete a pod by using the following command,
kubectl delete pod <pod-name>
So, after deleting a pod if we get other pods running that means Auto Healing is working. So, even though 1 pod is removed or deleted a new pod is replaced with the older one.
Step 13: To delete a complete deployment, so that deployment is brought down we can use the following command,
kubectl delete -f deployment.yaml

Conclusion
In Conclusion, Deployment in Kubernetes (K8s) involves efficiently managing containerized applications. Various deployment types, such as rolling updates, blue-green deployments, and canary releases, offer flexibility in controlling the release process.
Rolling updates ensure smooth transitions, blue-green deployments enable seamless switching between versions, and canary releases allow gradual testing with a subset of users.
Using Kubernetes (K8s) for deployment comes with several key features that enhance the management of containerized applications:
Scaling: K8s supports automatic horizontal scaling, adjusting the number of running instances based on resource demand, ensuring optimal performance and resource utilization.Health Checks and Self-healing: Kubernetes continuously monitors the health of containers and automatically restarts or replaces unhealthy instances, contributing to application reliability.Rollbacks: In case of issues with a new deployment, K8s supports easy rollbacks to a previous version, maintaining application stability.
Hope you find it helpful🤞 So I encourage you to try this on your own and let me know in the comment section👇 about your learning experience.✨
👆The information presented above is based on my interpretation. Suggestions are always welcome.😊
~Smriti Sharma✌